
2Spring×Kotlin×MySQL×Mybatis×ThymeleafでサンプルWebアプリ作ってみた
実務では基本的にJavaでWebアプリを作ることが多いのですが
Kotlin使ったらどうなのかと思いちょっと勉強してみました。
DBはMySQL, ビルドにGradleを使用し、
IDEはIntelliJ Community Editionを使用します。
(ちなみにEclipse or STSにKotlinプラグインを入れて動かすことも可能ですが、IntelliJの方が便利な面が多そうなのであまりおすすめできないです。IntelliJはCommunity Editionであれば無料で使えます)
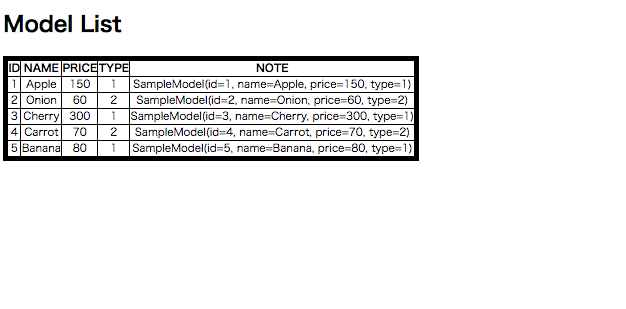
出来上がったものがこちら
プロジェクトを作成するまでの準備
Spring Initializrで雛形作成
以下のサイトにアクセス
https://start.spring.io/
今回は以下の設定でプロジェクトを作成しました。
| 項目 | 設定値 |
|---|---|
| Project | Gradle |
| Language | Kotlin |
| Spring Boot | 2.1.4 |
| Packaging | Jar ※組み込みTomcatを使用する場合はJarで良いみたいです |
| Java Version | 8 |
| Dependencies | DevTools, Web, Thymeleaf, MySQL, JDBC, MyBatis |
その他の設定はお好みで。
ダウンロードが終わったら展開し、IntelliJにインポートしましょう。
DB
以下のDBを作成します。
-- DB作成
CREATE DATABASE sample;
USE sample;
-- テーブル作成
CREATE TABLE item(
    id INTEGER PRIMARY KEY AUTO_INCREMENT,
    name VARCHAR(10),
    price INTEGER,
    type INTEGER
);
-- データ挿入
INSERT INTO
    item(name, price, type)
VALUES
    ('Apple', 150, 1),
    ('Onion', 60, 2),
    ('Cherry', 300, 1),
    ('Carrot', 70, 2),
    ('Banana', 80, 1)
;
実装
ディレクトリ構成は以下のようになります。
src
├── main
│   ├── kotlin
│   │   └── com
│   │       └── example
│   │           └── sample
│   │               ├── SampleApplication.kt // デフォルトのまま
│   │               ├── ServletInitializer.kt // デフォルトのまま
│   │               ├── controller
│   │               │   └── SampleController.kt
│   │               ├── mapper
│   │               │   └── SampleMapper.kt
│   │               ├── model
│   │               │   └── SampleModel.kt
│   │               └── service
│   │                   └── SampleService.kt
│   └── resources
│       ├── application.yml
│       ├── messages.properties
│       ├── mybatis
│       │   └── mapper
│       │       └── SampleMapper.xml
│       ├── static
│       │   ├── css
│       │   │   └── style.css
│       │   └── js
│       └── templates
│           └── index.html
└── test // デフォルトのまま(今回触らないので省略)
ControllerからServiceを呼んで
その中でMapperを使ってDBにアクセスし、Modelを返し、Viewに表示するという
よくあるパターンで作っていきます。
設定ファイル
とりあえずapplication.propertiesをymlにして以下のように設定する。
(ymlにしたのは私の好みです)
spring:
  datasource:
    url: # TODO Set connection string  ex. jdbc:mysql://localhost:3306/sample
    username: # TODO Set username
    password: # TODO  Set password
    driverClassName: com.mysql.jdbc.Driver

mybatis:
  mapper-locations: classpath*:/mybatis/mapper/*.xml
  type-aliases-package: com.example.sample.model
  configuration:
    map-underscore-to-camel-case: true
    default-fetch-size: 100
    default-statement-timeout: 30
    cache-enabled: false
ポイントとしては
- datasourceを設定する。
- 「mapper-locations」にmybatisのMapper(.xml)の場所を設定する。
- 「type-aliases-package」にMapperで扱うModelクラスを配置する場所を設定する。
くらいかと思います。その他の設定はよく使いそうなものをとりあえず書いてます。
Model
テーブルに対応したModelを作成します。
package com.example.sample.model

data class SampleModel(var id: Int, var name: String, var price: Int, var type: Int)
JavaだとGetter、SetterやらConstructorなどいっぱい書かないといけないのが
Kotlinだとなんと一行で書けちゃいます。
上記の場合だと、
id(Int型), name(String型), price(Int型), type(Int型)というフィールドを持った
SampleModelというクラスができます。もちろんGetter, Setter, Constructorも込みです。
また、Modelのようにデータを格納するためだけのクラスには
data修飾子を付けておくのがKotlinでは慣習のようです。
これを付けておくとtoStringやcopyなどの関数を自動的に実装してくれるみたいです。便利ですね。
Mapper
次にMapperです。
Mapperアノテーションを付与したMapperインターフェースを作成します。
package com.example.sample.mapper

import org.apache.ibatis.annotations.Mapper
import com.example.sample.model.SampleModel

@Mapper
interface SampleMapper {
    // 抽象メソッドで定義する
    fun find(): List<SampleModel>

}
Kotlinではfunキーワードでメソッド、関数を定義できます。
ここではSampleModelのリストを返すfind抽象メソッドを定義しています。
Mybatisを使うとこれらの抽象メソッドが自動で実装されます。
次にこのMapperインターフェースに対応したSQLが書かれたxmlファイルを作成します。
<?xml version="1.0" encoding="UTF-8" ?>
<!DOCTYPE mapper
        PUBLIC "-//mybatis.org//DTD Mapper 3.0//EN"
        "http://mybatis.org/dtd/mybatis-3-mapper.dtd">
<mapper namespace="com.example.sample.mapper.SampleMapper">

    <select id="find" resultType="SampleModel">
        SELECT
            id,
            name,
            price,
            type
        FROM
            item
    </select>

</mapper>
namespaceに対象のMapperインターフェースのパス、
idにメソッド名、resultTypeに戻り値の型を設定します。
今回はapplication.ymlにtype-aliases-packageを設定しているので
resultTypeは完全修飾クラス名ではなくクラス名だけで動くようになっています。
Service
次にServiceです。
package com.example.sample.service

import com.example.sample.mapper.SampleMapper
import com.example.sample.model.SampleModel
import org.springframework.stereotype.Service
import org.springframework.transaction.annotation.Transactional

@Service
@Transactional
class SampleService(private val mapper: SampleMapper) {

    fun find() : List<SampleModel> = mapper.find()

}
constructorキーワードの前に@Autowiredを付与することで
SampleMapperをインジェクトしています。
上記のようにコンストラクタに値を渡すだけでインジェクトできるみたいです。
こちらもJavaより簡単に書けて楽そうですね。
Controller
次にControllerです。
package com.example.sample.controller

import com.example.sample.service.SampleService
import org.springframework.beans.factory.annotation.Autowired
import org.springframework.stereotype.Controller
import org.springframework.ui.Model
import org.springframework.web.bind.annotation.GetMapping

@Controller
class SampleController {

    @Autowired
    lateinit var service: SampleService

    @GetMapping("/")
    fun index(model: Model): String  {
        val modelList = service.find()
        model.addAttribute("modelList", modelList)
        return "index"
    }
}
こちらもSampleServiceをインジェクトしています。
Serviceでは省略しましたが、本来KotlinではAutowiredするときにlateinitキーワードをつける必要があります。
ですが、もっと簡単に以下のように書くこともできます。
@Controller
class SampleController(private val service: SampleService){

    @GetMapping("/")
    fun index(model: Model): String  {
        // 以下3行とも同じように動く
        // model.addAttribute("modelList", service.find())
        // model.set("modelList", service.find())
        model["modelList"] = service.find()
        return "index"
    }
}
View
Controllerで設定した値を表示します。
<!DOCTYPE html>
<html xmlns:th="http://www.thymeleaf.org">
<head>
    <meta charset="UTF-8">
    <link rel="stylesheet" type="text/css" href="../static/css/style.css" th:href="@{/css/style.css}">
    <title>Kotlin Spring Sample</title>
</head>
<body>

<h1>Model List</h1>

<table>
    <tr>
        <th th:text="#{title.id}">No</th>
        <th th:text="#{title.name}">Name</th>
        <th th:text="#{title.price}">Price</th>
        <th th:text="#{title.type}">Type</th>
        <th th:text="#{title.note}">Note</th>
    </tr>
    <th:block th:each="model : ${modelList}">
        <tr>
            <td th:text="${model.id}"></td>
            <td th:text="${model.name}"></td>
            <td th:text="${model.price}"></td>
            <td th:text="${model.type}"></td>
            <!--/* model.toString()が実行される */-->
            <td th:text="${model}"></td>
        </tr>
    </th:block>
</table>

</body>
</html>
実行結果
ハマったところ
STSで頑張ろうとしてハマる
私はIntelliJをそこまで使い込んだことがなかったので、最初STSを使おうとしていました。
STSにKotlin Pluginを入れ、Spring Initializrで作ったプロジェクトを入れて動かそうとすると
…動かない。
GithubやQiitaで上がっているサンプルコード等をImportしてもそのままでは動かず…。
どうやらKotlinでは継承元やオーバーライド元のクラスや関数にopenという修飾子をつけるようで
参考にしていたコードには軒並みopen修飾子が付いておらずエラーになっていました。
IntelliJを使うと自動的にopen修飾子をつけるプラグインが動くようです。(STSでもできるのかもしれないですが、設定めんどくs...)
他にも色々イマイチなところが多かったので、最初から大人しくIntelliJ使っとけばよかった…。
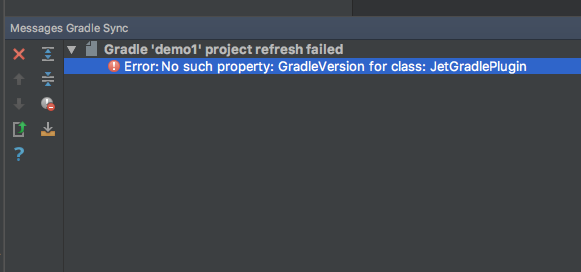
IntelliJでGradleが動かない…
これは最後までよくわからなかったのですが
Spring initializrで作成したプロジェクトをインポートしても
「No such property: GradleVersion for class: JetGradlePlugin」
みたいなエラーが出て動かせなかったです。
色々調べてみたら、gradle/wrapper/gradle-wrapper.propertiesで設定している
gradleのバージョンを下げると動く、みたいな記事を見つけたので
その通りにしたらとりあえず動きました。
distributionBase=GRADLE_USER_HOME
distributionPath=wrapper/dists
# 変更前
# distributionUrl=https\://services.gradle.org/distributions/gradle-5.2.1-bin.zip
# 変更後
distributionUrl=https\://services.gradle.org/distributions/gradle-4.6-all.zip
zipStoreBase=GRADLE_USER_HOME
zipStorePath=wrapper/dists
Mybatisの設定周りで混乱する
これはKotlinに移行したからとか関係なく完全に自分の知識不足なのですが、
Mybatisの設定を調査するのにとても時間がかかりました。
application.ymlにはSpringの設定しか書けないという先入観があり、
Configurationアノテーションを使おうとしたり、SqlSessionTemplateクラスを使おうとしたり
色んな手法で迷いまくったあげく、最終的にはapplication.ymlに全て記載するのに落ち着きました。
mybatis-spring-boot-starterを使うと以下のようにapplication.ymlに記載するだけで動くみたいです。
spring:
  datasource:
    url: # TODO Set connection string  ex. jdbc:mysql://localhost:3306/sample
    username: # TODO Set username
    password: # TODO  Set password
    driverClassName: com.mysql.jdbc.Driver

# 以下Mybatisの設定
mybatis:
  mapper-locations: classpath*:/mybatis/mapper/*.xml
  type-aliases-package: com.example.sample.model
  configuration:
    map-underscore-to-camel-case: true
    default-fetch-size: 100
    default-statement-timeout: 30
    cacheEnabled: false
dependencies {
	// (中略) こんな感じに設定しておく(Spring InitializrでMybatisを入れると追加されているはず)
	implementation 'org.mybatis.spring.boot:mybatis-spring-boot-starter:2.0.1'

}
参考文献等
https://qiita.com/kazuki43zoo/items/ea79e206d7c2e990e478
https://www.shookuro.com/entry/2017/11/23/203318
https://qiita.com/k5n/items/18adb5c3503a54e96c22
https://stackoverflow.com/questions/53600179/errorno-such-property-gradleversion-for-class-jetgradleplugin